
Even the greatest chefs make mistakes in the kitchen, so the rest of us are bound to get it wrong from time to time. And while some things are sort of hard to come back from (no, you probably can’t save that loaf of sourdough turned charcoal), there are a lot of common slip ups that are easy to turn around without missing a beat. Here are some easy fixes to remember!
-
Over-whipped Cream
Some people don’t know that you CAN over-whip fresh heavy cream, but if you’ve ever had whipped cream that was more foamy than creamy and you can’t form a nice, smooth peak on the whip but rather one that is clumpy and jagged, you’ve seen it (the whipped cream in the photo below is over-whipped and close to breaking). And it’s easy to do, especially if you’re using a stand mixer, which whips cream to medium peaks in just about 1 minute. Luckily, it’s a simple fix.
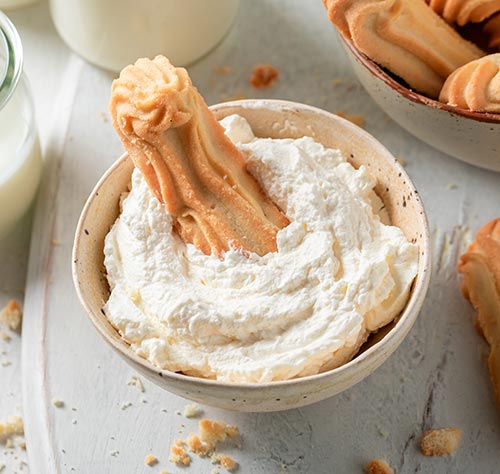
When you’re making whipped cream, always leave a few tablespoons of cream in the bottom of the container. If you find that you’ve whipped a little too far, drizzle in enough leftover cream to soften it. You may need to whip it for a few seconds after adding, but you may not, so check the texture first. -
Broken Buttercream (specifically meringue-based varieties)
These buttercreams are mixtures of a whipped meringue and butter, a delicate emulsion of fat and moisture. Emulsions can break for a number of reasons, but buttercreams usually separate (or “curdle”) because of temperature—either too hot or too cold. Some emulsions are hard to recover, but not a buttercream. You can almost always fix a buttercream.
If you’re buttercream starts to look soupy while it’s mixing, don’t panic. That just means the fat in your mixture is too warm and melting into the liquids. Take the bowl off the mixer and put it in the refrigerator until the sides begin to solidify, about 30 minutes to an hour. Then, return it to the mixer and beat it until it’s light and fluffy.
On the other hand, if your mixture looks greasy and lumpy, with big curds and extra moisture, that’s an even easier fix. Just keep mixing. That’s it! Just let it keep mixing until it’s light and creamy. This might feel like it takes a long time, but you’re slowly warming the butter and giving it a chance to incorporate back into the mixture.
-
A Burning Pan
Whether you’re sautéing a simple chicken breast or searing meat for a braise, it’s a good thing when the pan drippings begin to brown and caramelize. That’s flavor! But that golden brown fond (the French way to say “the savory stuff at the bottom of the pot”) can quickly become too dark. When the drippings begin to burn, you risk introducing a bitter flavor to whatever it is you’re making, and no one wants that. The fond in this photo has burned and cannot be recovered.
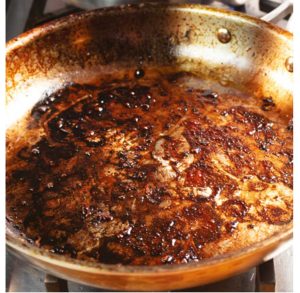
If you see the bottom of your pan getting a little darker than you’re comfortable with, deglaze—STAT! Grab a cup of water, a container of broth, or a bottle of wine and splash enough into your pan to cover the surface. Lower the heat a touch and scrape the fond from the pan. It will dissolve into the liquid and stop cooking. Let that mixture reduce as your items continue to cook, and then keep the heat a little lower until it’s finished. If you put too much liquid and it’s starting to steam your food instead of browning, you can either remove the main ingredient until the pan is basically dry or pour off a little of the liquid. Just remember that all of your flavor is now in there, so you don’t want to discard too much. -
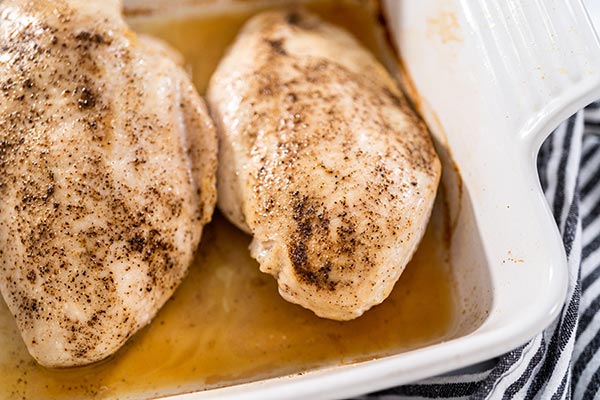
Food in the Oven Won’t Brown
Baking and roasting meats, fish, and veggies usually results in some browning (depending on the ingredients, of course), but that doesn’t always happen. You don’t have to take uncaramelized foods laying down, though, because you know what to do.
Assess the situation. If you’re items in baking dish, check the bottom to see if there’s a significant amount of moisture at the bottom. If so, it could be causing your ingredients to steam rather than roast (like in the picture below). Remember: browning cannot occur if there is moisture on the surface of your item. If so, remove the baking dish from the oven and transfer the contents to a rimmed baking sheet. Without the walls of the dish surrounding your items, they will be less exposed to any moisture. Going forward, avoid roasting items in a pan where the walls are taller than the food you’re cooking to avoid this issue.
If your food is cooked through but still not quite to your preferences, don’t forget about your broiler. A couple of minutes under the intense heat will get you some color without overcooking. To speed up the process, make sure your pan is on rack closet to the heat source. You can also brush the items with a little melted butter, which is filled with quick-to-caramelize milk solids.
-
Lumps or Clumps
There are a lot of foods we wish were smooth that don’t quite get there. Gravies, mashed potatoes, and custards (among others) can have visible lumps of veggies, starch, eggs, or whatever you may have used to thicken the mixture. Sometimes the item you’re working with is thin enough to strain through a mesh sieve, but an easier solution is an immersion blender.
Those bits and pieces don’t taste bad or negatively impact your dish in any way but texturally, so you don’t have to remove them. In seconds, an immersion blender can save nearly anything—including lumpy mashed potatoes, pastry cream, spreads and dips—with minimal effort by targeting the lumps and smoothing them back into the mixture. No need to dirty another bowl or container, just pulse the immersion (or stick) blender right into the pot. For things like gravies, you can be a little more aggressive but remember that too much blending can loosen the texture of things like puddings and mashed veggies, so go slowly and stop as soon as you’re satisfied. If you don’t have an immersion blender, you can use a traditional countertop one—but again, go slowly. They can be a lot more powerful.