
Tempering chocolate is the process of heating and cooling chocolate to ensure that it will set with a proper gloss and snap. Tempered chocolate will set quickly and will not show streaks or spots as it sets. Once set, properly tempered chocolate will harden and have the desired snap and shine. When chocolate is not tempered, it will take a long time to set and will have streaks on the surface. Once set, these streaks will turn gray and the chocolate will have a soft and grainy texture. You may have noticed this appearance on old chocolate at the back of your pantry. It’s likely melted and reset several times and is no longer in temper.
A thermometer can be helpful when tempering chocolate, but it is not mandatory. With a little practice, you can temper chocolate using only your wrist to gauge the temperature and a spoon to verify that it is setting properly.
Many home candy makers are intimidated by the thought of tempering chocolate; they think it is complex or difficult. While the physics of chocolate tempering are pretty complex, we don’t need to know much about these in order to be successful. In truth, tempering chocolate is like driving a car: automobiles are complex machines with many moving and electronic parts that most people know nothing about. However, most of us think nothing of getting behind the wheel and driving. Tempering chocolate is much simpler than driving a car, and there is no danger of getting speeding tickets or having a fender bender while tempering chocolate (unless you are tempering while driving, which we very officially do not endorse). You can do it!
There are several professionally used techniques to temper chocolate by hand, and there are numerous tempering machines on the market suited to home candy making. But for the home candy-maker tempering by hand, there is little reason to temper chocolate using any method other than the seeding technique. It is fast, clean, and highly effective. With just a little practice and patience, you can use the seeding method to properly temper chocolate every time.
- Weigh or measure the chocolate you will be tempering. As always, weight is the preferred method for measuring any ingredients.
- Weigh or measure a second amount of chocolate equal to 25 percent of the original amount. So, if you need 1 lb of tempered chocolate, you would want 1 lb of chocolate to temper, and then 4 oz (1/4 lb) for your second amount of chocolate. You will have a bit more chocolate than you need, but you can cool it and save it for next time.
- Fully melt the larger amount of chocolate using either a microwave or water bath. Remove the bowl of melted chocolate from the heat. The chocolate should be 120°F for dark chocolate or 110°F for milk or white chocolate.
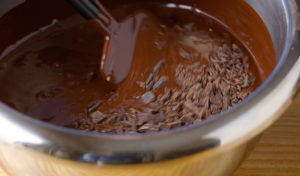
- Add the smaller amount of unmelted chocolate to the melted chocolate. This is called the seed; it will cool the melted chocolate and cause it to set the way you want. You can use either pieces or a single block as the seed; a single block has the advantage of easy removal once the chocolate is tempered.
- Stir the melted chocolate gently and constantly until the temperature falls to 85°F for dark chocolate or 83°F for milk or white chocolate. This will take 15 to 20 minutes, and most or all of the seed should have melted by the end of this time.
 6. Test the chocolate. Testing chocolate for temper is the only way to know for sure that chocolate is actually tempered. Following temperatures is a good guideline, but even with strict adherence to technique, no one can tell for sure whether chocolate is tempered without performing a test to see how it sets.
- Make sure the chocolate is below 90°F for dark or 87°F for milk or white chocolate.
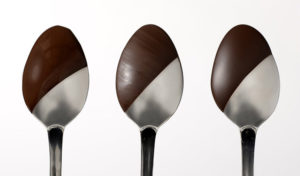
- Dip a spoon in the chocolate, place the spoon on the work surface, and leave it undisturbed for 7 to 8 minutes in the working room at 68°F. Resist the temptation to refrigerate the spoon! This will only give inaccurate results.
- After 8 minutes have passed, look closely at the chocolate on the spoon. If the chocolate has set so that it no longer looks wet, and the surface is uniform and without streaks, the chocolate is tempered.
- If the chocolate has not set or has set with a streaky appearance, the chocolate requires further seeding (see step 8).
- If the chocolate sets properly, gently warm it over a water bath not exceeding 89°F for dark chocolate or 86°F for milk or white chocolate.
- If all the seed has melted but the chocolate is not setting quickly without streaks or spots, it must be seeded more. Add a few more pieces or another small block to the bowl, and stir for another 3 to 4 minutes. After this time, test again (step 6), and proceed from there.
- Remove any unmelted seeds from the melted chocolate.
- Use the chocolate as desired while maintaining the proper working temperature.
When you work with tempered chocolate, it is crucial to keep it at the proper temperature. If it cools too much, it will thicken and set. If it is too warm, it will no longer be tempered and will not set properly. Dark chocolate should be used at 86° to 90°F, milk chocolate at 84° to 87°F.
There are several options for maintaining this crucial temperature:
- Some home candy makers use a heating pad to keep the bowl of chocolate warm.
- Some put the chocolate over a pot of water at the desired temperature.
- Some warm the chocolate in short bursts in a microwave.
- Others warm it briefly from time to time over a water bath or direct heat.
Regardless of which method you use, always take care to maintain your chocolate at these temperatures and you will be rewarded with a perfect set and shine.