Gentle warning: you are about to read a lot of information explaining the basic technique of laminated dough. Though it seems long and overwhelming, the process is technically simple, so take it step by step. When you are ready to try a recipe, read it all the way through before beginning to make sure you’re ready for each piece of the process.
Laminated doughs include croissant, puff pastry, and Danish. Their magic lies in technique, where sheets of dough are rolled and folded together with sheets of butter to create a stack of ultra-thin layers that expand when baked.
Proper layering (lamination) is vital, as it is the combination of fat and dough in even layers that causes expansion and creates the ultimate flaky texture characteristic of laminated doughs. When the dough is baked, the fat melts, creating pockets where released steam from the moisture in the dough acts to leaven the dough. As the steam leavens the pockets in between the dough layers, causing the product to expand and rise, the remaining fat “fries” the dough so that the air spaces are retained.
Creating the proper number of fat and dough layers is critical to the success of laminated doughs. With too few layers, the steam will escape and the pastry will not rise. Folding the dough too many times can be a problem because the layers of fat and dough merge together as the fat begins to become incorporated into the dough, rather than remaining as separate layers, thus preventing the dough from rising.
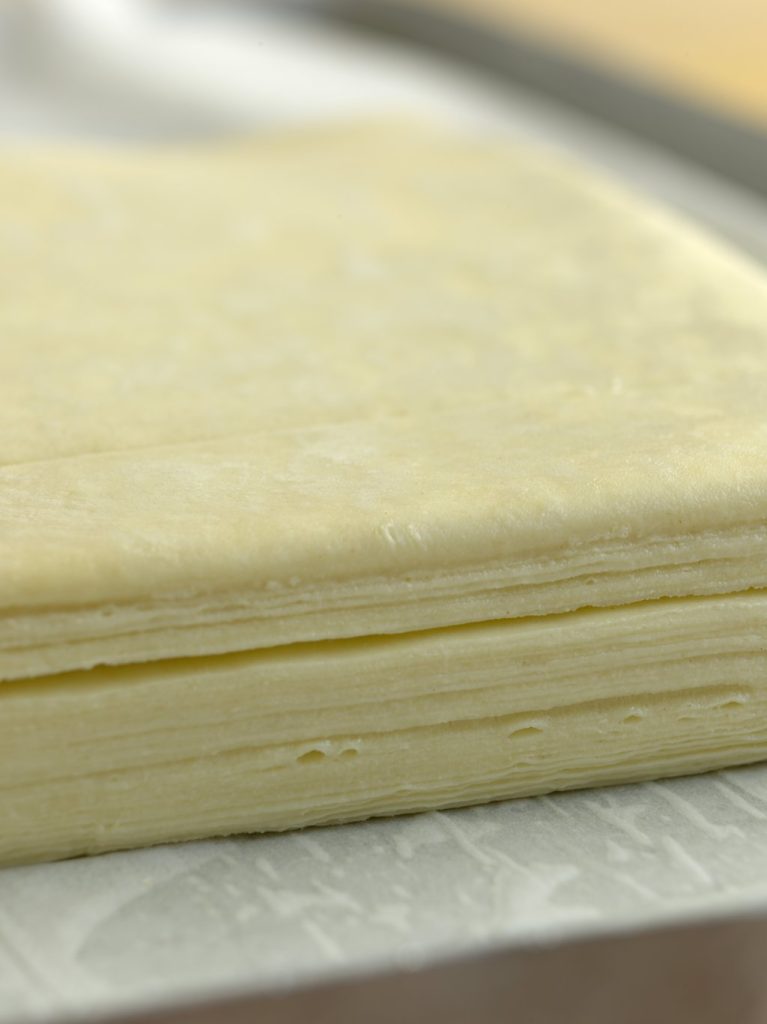
Folding may be the most important factor in making a laminated dough, as the distinct layers of fat and dough must be maintained throughout the process. The dough must be rolled out evenly and the corners kept squared throughout the lock-in (the stage at which the roll-in butter is introduced to the dough) and all subsequent folds to ensure proper layering. The basic steps for laminated doughs are:
1. A previously prepared dough (the initial dough) is folded and rolled together with a block of fat called a roll-in. To prepare the dough, follow your recipe. Puff pastry is a simple unleavened dough, but croissant and Danish dough are both yeasted and will be prepared like a bread dough.
2. Shape the prepared dough into a rough square or rectangle. Transfer to a sheet pan lined with parchment paper, wrap the dough in plastic wrap, and allow it to relax under refrigeration for 30 to 60 minutes. The dough should be gently rolled into the desired shape for the lock-in before it is refrigerated to reduce the amount of manipulation necessary during lock-in and lamination. While the dough is resting, prepare the roll-in fat.
3. To prepare the roll-in, the butter should be worked, either by hand or carefully using a stand mixer and dough hook attachment, until it is smooth and malleable but not overly soft. A number of different types of fats may be used in lamination. However, butter lends the best flavor and mouth feel.
4. Transfer the roll-in to a sheet of parchment paper. Cover with a second sheet and roll into a rectangle. Square off the edges, cover with plastic wrap, and refrigerate until firm but still pliable. Do not allow the roll-in to become cold. The temperature of the roll-in is also very important. It should be the same consistency as the dough when the two are rolled together. The butter must not be allowed to become so soft that it begins to ooze from the dough as it is rolled, nor should it be so firm that it could tear the dough or break into bits during rolling. Before use, the roll-in may be allowed to stand at room temperature for a few minutes if it is too hard, or re-refrigerated if it becomes too soft.
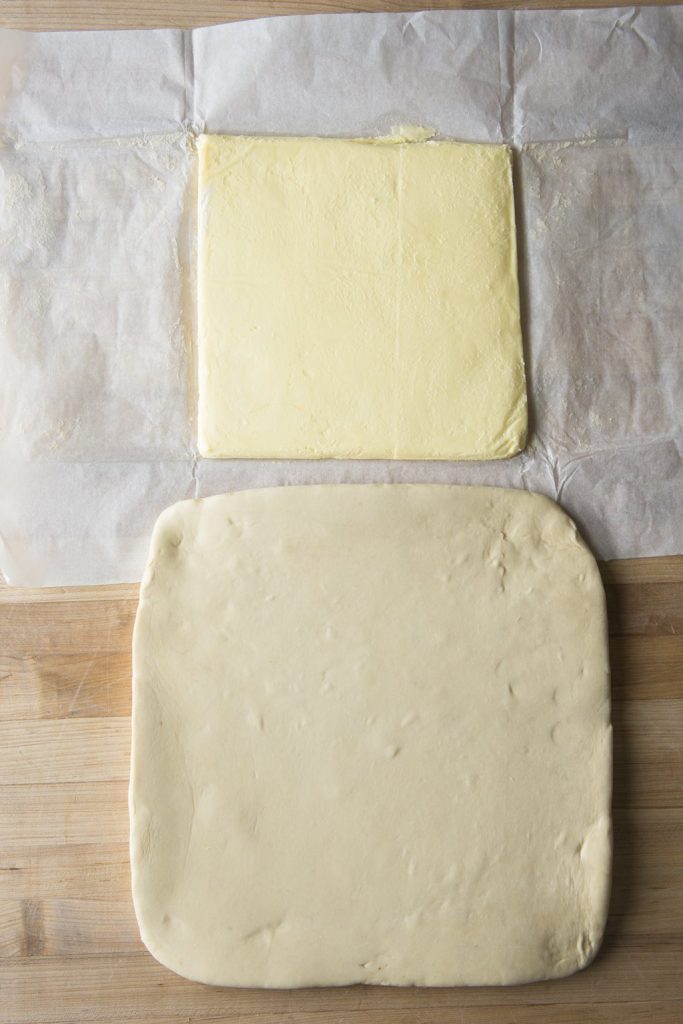
5. To lock the roll-in into the dough, turn out the dough onto a lightly floured work surface and roll it into a square or rectangle, keeping the edges straight and the corners squared. The roll-in fat can be added to the dough using one of several methods: envelope, single-fold or threefold.
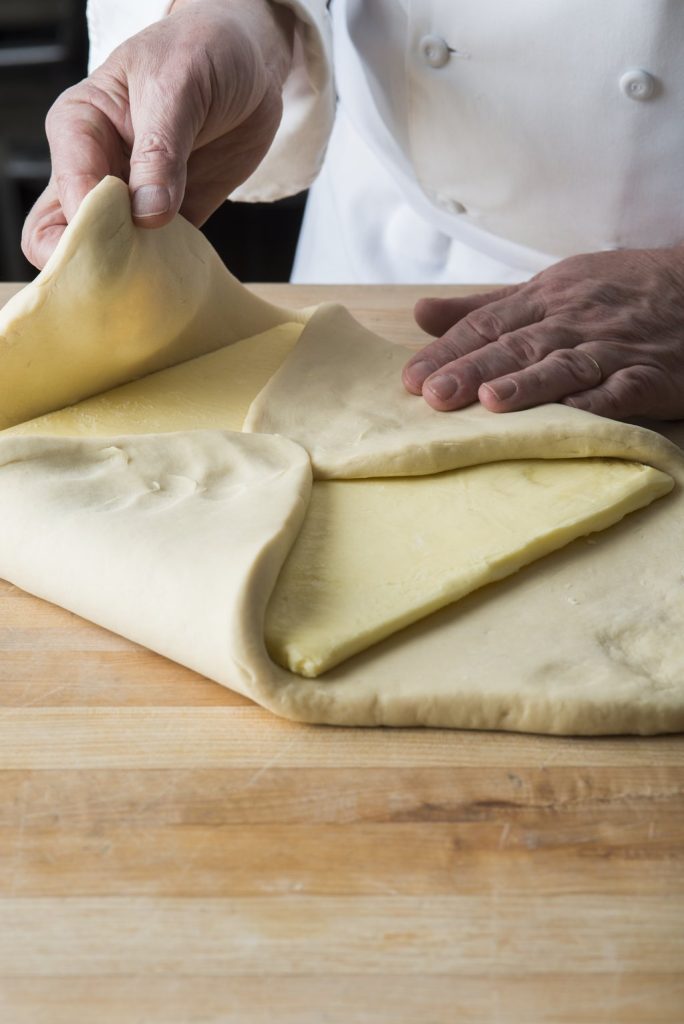
For the envelope method, the dough is rolled into a square or a rectangle. The roll-in is rolled into a smaller square or rectangle, and placed diagonally in the center of the dough so that each corner points to the center of a side of the dough. The corners of the dough are then folded over the fat envelope-style so that they meet in the center.
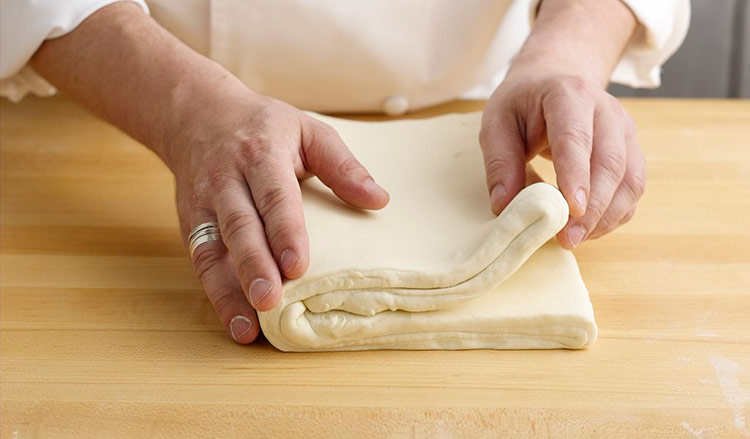
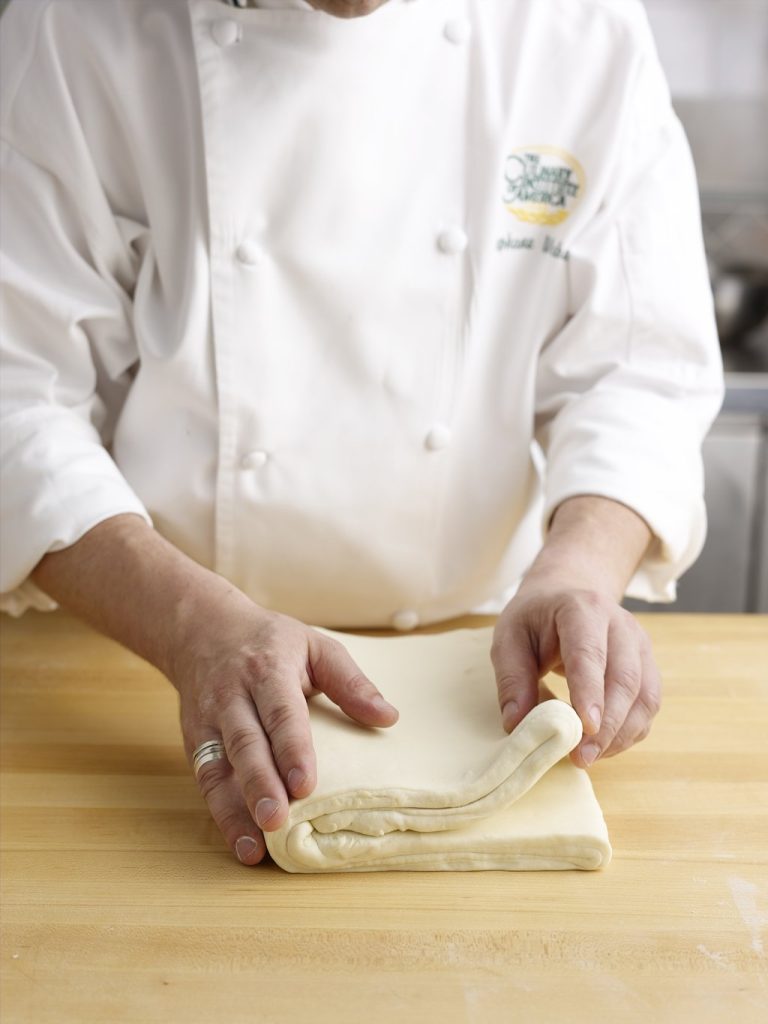
6. Administer your first fold. Though techniques and recipes vary, it is common to begin with a four-fold. Cover the dough in plastic wrap and allow it to rest for 30 minutes under refrigeration. For a four-fold or book-fold, divide the sheet of pastry visually into quarters, and fold the outer quarters into the middle so that their edges meet. Then fold the dough over as if closing a book. This type of fold quadruples the number of layer in the dough each time.
7. Turn the dough 90 degrees from its position before it was refrigerated and roll it out into a rectangle, making sure the edges are straight and the corners are squared. Administer a second fold (three-fold or four-fold). Cover the dough in plastic wrap and allow it to rest for 30 minutes under refrigeration.
Repeat this process two more times for a total of four folds, turning the dough 90 degrees each time before rolling and allowing the dough to rest, covered in plastic wrap under refrigeration, for 30 minutes between each fold.
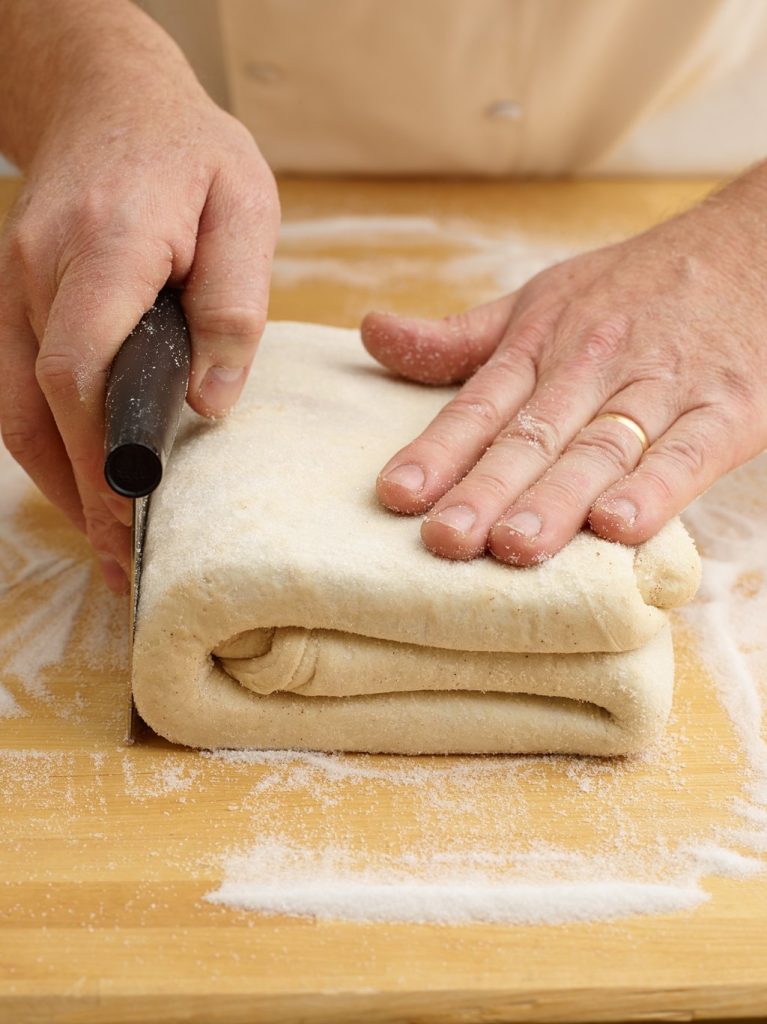
After the roll-in is added to the dough, each subsequent fold is usually either a three-fold or a four-fold. Each time, before folding and rolling the dough, brush any excess flour from its surface. When you fold the dough, the corners should meet squarely and the edges should be straight and perfectly aligned. After each fold, refrigerate the dough to allow it to relax and the butter to chill; the length of time the dough will need to rest will depend in large part on the temperature of the kitchen. For each fold, the dough is turned 90 degrees from the previous one to ensure that the gluten is stretched equally in all directions. Too much stress in one direction will make the dough difficult to roll and cause it to rise unevenly and become misshapen during baking as the gluten contracts.
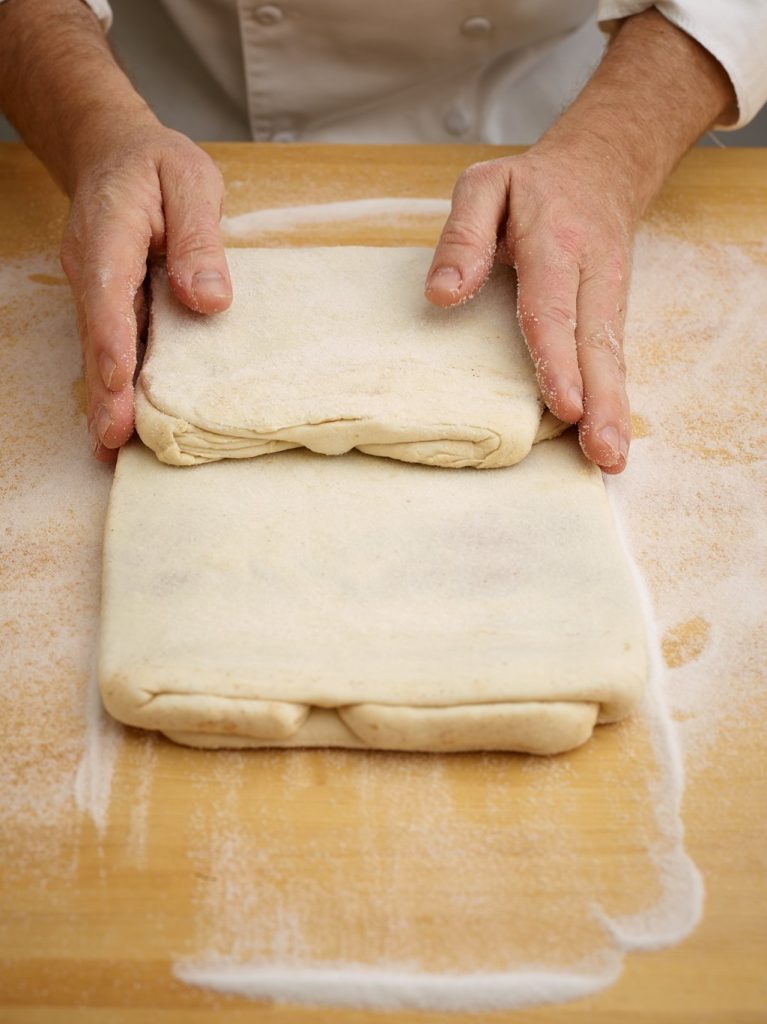
8. After completing the final fold, wrap the dough in plastic wrap and allow it to rest under refrigeration for 30 minutes before using.